Introduction
Taking screenshots is an essential skill for Chromebook users, whether you're capturing a full screen, a specific section, or using advanced tools for editing. Screenshots can help you save important information, share content with others, or troubleshoot technical issues effectively. In this guide, we’ll walk you through the different methods of taking screenshots on a Chromebook, complete with step-by-step instructions and helpful visuals to make the process simple and straightforward.
Whether you're new to Chromebooks or looking to refine your skills, this tutorial will ensure you're equipped to capture and edit screenshots like a pro. Let’s dive in!
How to Screenshot on a Chromebook for the Full Screen
Capturing the entire screen on a Chromebook is straightforward and can be done in just a few seconds. This method is ideal when you need to save everything visible on your screen at once. Follow these steps:
- Shortcut Key Combination: Press Ctrl + Show Windows key simultaneously. The "Show Windows" key is located in the top row of your keyboard and looks like a rectangle with two vertical lines.
- Once you press the combination, your screen will briefly dim, signaling that the screenshot has been successfully taken.
- The screenshot will be automatically saved in your Downloads folder. You can access it by opening the "Files" app and navigating to "Downloads."
This method ensures that every detail visible on your screen is captured without needing any additional adjustments.

How to Screenshot on a Chromebook for Part of the Screen
Sometimes, you may only need to capture a specific portion of your screen instead of the entire display. Chromebooks make this process equally simple with an intuitive method:
- Shortcut Key Combination: Press Ctrl + Shift + Show Windows key at the same time.
- Your cursor will change into a crosshair icon. Use this crosshair to click and drag over the area you want to capture.
- Once you’ve selected the desired area, release the mouse or trackpad button to take the screenshot.
- Like full-screen screenshots, partial screenshots are also saved in your Downloads folder.
This method is particularly useful when you want to focus on specific content without capturing unnecessary elements from your screen.

How to Screenshot on a Chromebook Using the Screen Capture Button
Chromebooks come equipped with an advanced Screen Capture tool, which offers more flexibility compared to keyboard shortcuts. This tool allows users to choose between capturing the entire screen, a specific window, or a custom area.
Here’s how you can use it:
- Open the Quick Settings menu by clicking on the clock located in the bottom-right corner of your screen.
- Look for and select the Screen Capture button from the menu options.
- Alternatively, you can use the shortcut Ctrl + Alt + Show Windows key to open the Screen Capture tool directly.
- Once activated, you’ll see options at the bottom of your screen:
- Full-screen capture
- Window capture
- Partial capture
5. Select your preferred option and follow the prompts to take your screenshot.
The Screen Capture tool is particularly helpful when you want more control over how you take screenshots without relying solely on keyboard shortcuts.

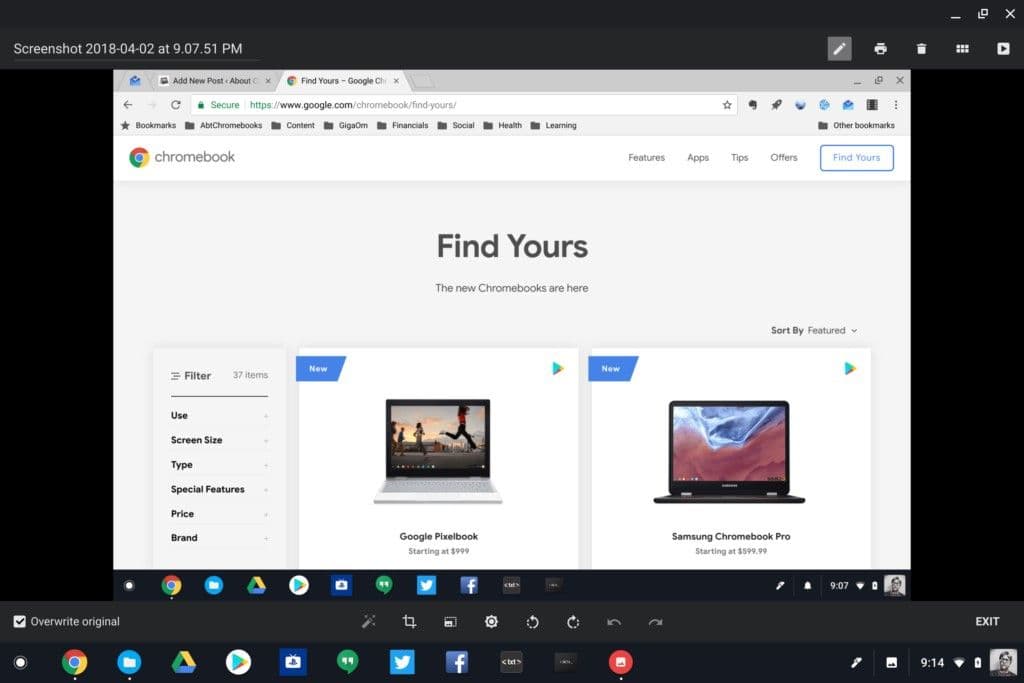
How to Edit a Screenshot
After taking a screenshot on your Chromebook, you may want to edit it for clarity or emphasis. Chromebooks provide built-in tools for basic editing tasks like cropping, annotating, or adjusting brightness and contrast.
Here’s how you can edit your screenshots:
- Open your screenshot from the Downloads folder by double-clicking it.
- The image will open in Chrome OS’s default image viewer, which includes basic editing options.
- Use these tools to crop out unnecessary parts of the image or annotate important sections with text or drawings.
- If you need more advanced editing features, consider downloading apps like Canva or Pixlr from the Google Play Store.
Editing screenshots allows you to customize them for presentations, tutorials, or sharing with others in a professional manner.

Why Screenshots Are Essential for Chromebook Users
Screenshots are an incredibly versatile tool that serves various purposes:
- Sharing Information Quickly: Whether you're collaborating with colleagues or sharing content with friends and family, screenshots make it easy to convey information visually.
- Troubleshooting Issues: Screenshots are invaluable when reporting technical problems or seeking help online since they provide clear visual context for others.
- Saving Important Content: From online receipts to educational resources, screenshots let you save content that might otherwise be temporary or hard to access later.
Mastering these screenshot techniques ensures that Chromebook users can handle any situation requiring visual documentation.
Conclusion
Taking screenshots on a Chromebook is an essential skill that every user should master. Whether you're capturing an entire screen, focusing on specific areas, or using advanced tools like Chrome OS’s Screen Capture feature, these methods are designed for ease and efficiency. Additionally, editing tools allow users to customize their screenshots for better communication and presentation.
By following this guide, you'll not only save time but also enhance your productivity when working with visual content on a Chromebook. Try out these methods today and see how they simplify your daily tasks!