Introduction
Facebook has become an integral part of our lives, connecting us with friends, family, and communities around the globe. However, concerns about privacy, data security, and the desire for a digital detox are leading more people to consider stepping away from the platform. Whether you want a temporary break or are ready for a permanent departure, this guide will walk you through every step of the process, ensuring you understand your options and can make the best decision for your digital life.
Understanding Deactivation and Deletion
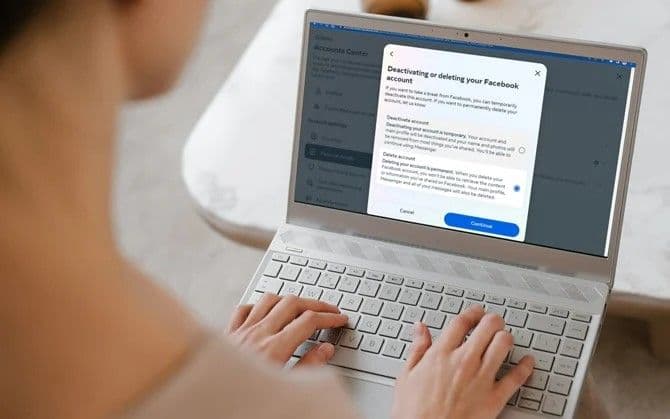
Before you proceed, it’s important to distinguish between deactivating and deleting your Facebook account. Both options allow you to step away from Facebook, but they have very different consequences.
Deactivation:
- Temporarily disables your profile and removes your name and photos from most things you’ve shared.
- Your data remains stored on Facebook’s servers, but is not visible to others.
- You can reactivate your account at any time by logging back in.
- Messenger can still be used if you choose to keep it active.
- Some information, such as messages you’ve sent to friends, may still be visible to them.
Deletion:
- Permanently removes your profile, photos, posts, and all information you’ve added.
- You lose access to Messenger and any third-party apps that use Facebook for login.
- The deletion process includes a 30-day grace period, during which you can cancel the deletion by logging back in.
- After 30 days, all your data is permanently erased from Facebook’s servers, though some logs and residual data may be retained for legal or business purposes.
- Messages you’ve sent to others may still be visible to them, even after your account is deleted.
How to Download Your Facebook Data
Before deleting your account, it’s wise to download a copy of your Facebook data. This ensures you don’t lose important memories, messages, or files you may want in the future. Here’s how to do it:
- Log in to your Facebook account.
Enter your credentials on the Facebook homepage, making sure you’re using the account you want to download data from. Double-check that you’re on a secure connection to protect your information. - Click your profile picture in the top right corner and select Settings & Privacy.
Once logged in, locate your profile picture or the downward arrow in the upper right corner. Click it to open a dropdown menu, and select “Settings & Privacy.” This menu gives you access to all the account management features you’ll need. - Choose Settings.
Within the “Settings & Privacy” menu, click on “Settings.” This will take you to the main settings page, where you can control every aspect of your Facebook account, from privacy to notifications and beyond. - In the left menu, click Your Facebook Information.
On the settings page, look for the navigation panel on the left side. Find and select “Your Facebook Information.” This section contains tools for managing your data and activity on Facebook, including downloading your information. - Select Download Your Information.
Under “Your Facebook Information,” click on “Download Your Information.” This will bring up a detailed page where you can choose what data to include in your download, ensuring you only save what’s important to you. - Choose the format (JSON or HTML), media quality (High, Medium, Low), and date range (Last week, Month, Year, All time, or Custom).
You’ll see options to customize your download. Select your preferred file format (JSON for developers or HTML for easier reading), pick the quality for media files, and decide the time range for the data you want to export. This allows you to tailor the download to your needs. - Use checkboxes to select the types of data you want to download.
Facebook allows you to be selective about what you want to keep. You can check or uncheck boxes for posts, photos, videos, comments, likes, friends, and more. This way, you avoid downloading unnecessary data. - Click Request a Download.
Once you’ve made your selections, click the “Request a Download” button. Facebook will begin preparing your file, and you’ll receive a notification when it’s ready to download. Depending on the amount of data, this process could take several minutes or even hours.
How to Delete Your Facebook Account from a Browser
If you’re ready to permanently remove your Facebook account using a web browser, follow these detailed steps:
- Log in to your Facebook account on your preferred web browser.
Open your browser, go to www.facebook.com, and enter your email and password to access your account. Make sure you’re signed in to the account you want to delete.

2. Click your profile picture in the top right corner and select “Settings & privacy.”
Once logged in, locate your profile picture at the top right of the Facebook homepage. Click it to open a dropdown menu, then choose “Settings & privacy” from the list of options to access your account settings.

3. Click on “Settings.”
In the “Settings & privacy” menu, you’ll see several options. Click on “Settings” to open the main settings page for your Facebook account.
3. In the left menu, select “Your Facebook information.”
On the left-hand side of the settings page, find and click on “Your Facebook information.” This section contains all the tools you need to manage your account data and privacy.
4. Choose “Deactivation and deletion.”
Within the “Your Facebook information” section, look for the option labeled “Deactivation and deletion.” Click on it to proceed to the next step, where you can choose between temporarily deactivating or permanently deleting your account.
5. Select “Delete account” and click “Continue to account deletion.”
On the “Deactivation and deletion” page, select the option for “Delete account.” Then, click the “Continue to account deletion” button to move forward with the process.

6. Follow the on-screen instructions to confirm deletion.
Facebook will guide you through a series of prompts to confirm your choice. You may be asked to enter your password, review what will be deleted, and acknowledge that this action is permanent before finalizing the deletion.

How to Delete Your Facebook Account Using the Mobile App
If you prefer to manage your account directly from your mobile device, deleting your Facebook account through the app is straightforward. Follow these steps to ensure you complete the process correctly:
- Open the Facebook app
Launch the Facebook app on your smartphone, then tap the three horizontal lines (menu) located either at the bottom right (iOS) or top right (Android) of your screen. This will open the main navigation menu where you can access your account settings. - Go to Settings & privacy
Scroll down the menu until you find the “Settings & privacy” section. Tap on it to expand more options, making sure you’re in the right place before proceeding to the next step. - Access Settings
Under the expanded menu, tap on “Settings.” This will take you to a new screen where you can manage all aspects of your Facebook account, including security, privacy, and account ownership.

4. Find Account ownership and control
Scroll through the settings until you locate “Account ownership and control.” Tap this option to enter the section dedicated to managing your account’s status and legacy settings.

5. Select Deactivation and deletion
Inside the account ownership and control section, tap on “Deactivation and deletion.” Here, you’ll be presented with the choices to either temporarily deactivate or permanently delete your account.

6. Choose Delete account and continue
Select “Delete account” and then tap “Continue to account deletion.” Carefully follow the on-screen prompts, review the consequences, and enter your password to confirm and finalize the deletion process1.
How to Cancel Facebook Account Deletion
If you change your mind after starting the deletion process, you have a 30-day window to reverse your decision.
- Log in to your Facebook account within 30 days of initiating deletion.
If you change your mind, simply visit Facebook and log in with your usual credentials within 30 days of starting the deletion process. This will pause the deletion and give you the option to restore your account. - You’ll see an option to Cancel Deletion.
Upon logging in, Facebook will display a prompt informing you that your account is scheduled for deletion. You’ll be given the option to stop the process and recover your account. - Click Cancel Deletion to restore your account.
Click the “Cancel Deletion” button to fully restore your account, including your posts, photos, and other data. Your account will be active again as if you never started the deletion. - After 30 days, your account and all its data are gone for good.
If you do not cancel the deletion within 30 days, Facebook will permanently erase your account and all associated data, and recovery will no longer be possible.
What Happens After Deletion?
Once your Facebook account is deleted:
- All your profile information, photos, posts, and videos are permanently erased from Facebook’s servers.
- You lose access to Messenger and any apps or websites that use Facebook for login.
- Some information, such as messages you’ve sent to others, may remain visible to them.
- Facebook may retain limited data for legal or business reasons, but your digital identity on the platform will be erased.
- Third-party apps that previously had access to your Facebook data may still retain some information, as Facebook cannot control data held by external services.
Key Points:
- Account deletion is irreversible after 30 days.
- Download your data before deleting your account.
- Consider the impact on third-party logins and Messenger.
Conclusion
Deleting your Facebook account is a significant decision with permanent consequences. Whether you’re motivated by privacy concerns, a desire for digital detox, or simply wish to reclaim your time, it’s important to understand the full implications of your choice. Take the time to download your data, consider whether deactivation might suit your needs, and follow the steps carefully to ensure your digital footprint is managed according to your wishes.
Remember, while deleting your Facebook account removes your presence from the platform, some data may persist elsewhere, especially with third-party apps. Make sure to update your logins and inform your contacts if necessary. Ultimately, your digital life is yours to control. By following this guide, you can take confident steps toward a more intentional and secure online presence.
Frequently Asked Questions (FAQs)
Q: Can I recover my Facebook account after deletion?
A: You can only recover your account within 30 days of initiating deletion. After that, your account and data are permanently erased.
Q: What happens to my messages and posts after deletion?
A: Messages you’ve sent to others may still be visible to them. All your posts, photos, and personal data will be deleted from Facebook’s servers.
Q: Can I use Messenger after deleting my Facebook account?
A: No. Deleting your Facebook account also deletes your Messenger access and all associated conversations.
Q: How long does it take for my data to be deleted?
A: Facebook begins the deletion process after a 30-day grace period. It may take up to 90 days for all your data to be removed from their servers.